Showing posts with label Silhouette Online Store. Show all posts

Friday, August 1, 2014

"Silhouette Challenges #16 "Create a Shadow using the Offset Feature"

It's the time for another challenge over at

Ch# 16 "Create a Shadow using the Offset Feature"
Begins: Friday, August 1
Ends: Sunday, August 31

A blog dedicated to the Silhouette Cutting Machines.
You MUST use a Silhouette somehow in your project.

Sponsor this month is:


Silhouette 25-Pack Chipboard

Hello everyone!  For this month's challenge, I decided to incorporate one of the things that really means summer to me- fireflies!  The background of this card is pretty simple- it's two scraps from my scraps bin that I thought looked cool together, with some orange ribbon between them. I put them on an orange card base- it's not often I get to use orange outside of Halloween! If you're wondering why my picture's at a slight angle, it's because the blue paper has a shine to it and my super bright craft room lights were not cooperating with the shiny paper, so I had to put it at an angle to photograph it.

I bought this cute firefly from the Silhouette Online Store, and created a shadow to go around it to make it really stand out from the background paper.  I added some gems to its' antennae and a TON of glitter glue to its' bottom. It's kind of hard to tell, but he's adhered down with foam squares.

To finish it off, I cut a banner by hand from another scrap of paper I had, and stamped my sentiment.  It's actually from a Pink by Design stamp set, and it's only part of a saying, but I just masked off the rest.


Head in over to see what the DT has created for you inspiration and link up today.
Click HERE

On a sadder note, this will be my last post as a Design Team member at Silhouette Challenges.  I hope you'll all continue to play along with the challenges and get to know your Silhouette machines better. I know I will!
Pin It

Sunday, June 22, 2014

"Silhouette Challenges #14 "Create your own Shaped Card"

It's the time for another challenge over at

Ch# 14 Create your own Shaped Card 
(No pre designed shaped card files)
Begins: Sunday, June 1
Ends: Monday, June 30

A blog dedicated to the Silhouette Cutting Machines.
You MUST use a Silhouette somehow in your project.

Sponsor this month is:

(3) Silhouette Replacement Blades

One of the things I love about challenges is that it, well, challenges me to think outside of the box!  When I saw this cut in the Silhouette Online store of a deer head, I knew it would be fun to use for our Father’s Day cards this year.  Normally, I would have cut a couple of A2 card bases, picked some patterned paper, and put the cuts on there.  But instead, I used this challenge as an incentive to make them into shaped cards!


In the Silhouette Studio, I layered the cuts up how I was going to have them look once they were cut.  Then I made an offset, chose how big I wanted it to be, and mirrored it above.  I moved them until they were touching and then welded them together.  This gave me my very own, one of a kind, shaped card!

I picked "Dad-ish" kind of patterned papers- plaid and woodgrain- for this card.  The woodgrain is actually two layers, so I used pop dots in between them for some dimension.


Head in over to see what the DT has created for you inspiration and link up today.
Click HERE

Pin It

Thursday, May 22, 2014

Silhouette Challenges #13 "Gift Bag"

It's the time for another challenge over at

Ch# 13 Gift Bag (No Boxes)
Begins: Thursday, May 1
Ends: Saturday, May 31

A blog dedicated to the Silhouette Cutting Machines.
You MUST use a Silhouette somehow in your project.

Sponsor this month is:


Vinyl Ease 30 Sheets of Permanent Adhesive Backed Vinyl for Craft Cutters, 
6 by 12-Inch, Assorted

Here's my Gift Bag project


Last year, my three sister-in-laws were so sad that the Easter bunny had decided they were all too old to get Easter baskets anymore.  I decided that even though they weren't getting Easter baskets, that didn't mean they couldn't get Easter bags!

I made these three cute bags from files I got from the Silhouette Online Store.  Before I cut the bags, I used my sketch pens to write their names at the bottom of the bag.  I love how easy it was, and it personalized each bag for them!

I filled the bags up with candy and an iTunes gift card for each of them.

Head in over to see what the DT has created for you inspiration and link up today.
Click HERE


Pin It

Saturday, May 3, 2014

Silhouette Challenges Blossom Hop Day 1


Bring

So Silhouette Challenges is celebrating .

We are on Day 1!

There are only a few stops on this hop each day, and you are going to love the projects you see.

I am the ninth stop.
To start at the beginning Click HERE

I had a lot of fun making my project for today's hop!  I chose the 3D cherry blossom flower cut from the Silhouette Online Store (ID# 55887, in case you were wondering) as my blossom.  Here's a picture of the two projects together, and then I'll show you each one seperately.


The card was pretty basic, because I wanted the blossom to be the center of attention.  I used a piece of patterned paper from Studio Calico and cut it to the size of an A2 card.  Then I used some white cardstock, but it to the size I wanted for the front of the card, an punched it with a Martha Stewart border punch.  Then I adhered the blossom, which I had cut with my cameo and chalked on the edges for dimension.


The box is also pretty basic, to be honest.  I used another blossom, cut from the cameo and chalked.  I cut the box out from my cameo as well- it's just a basic 3d box, you could use any one you wanted.  I used another sheet of the Studio Calico paper, and adhered the blossom to the top, then used the white cardstock to cut panels for each side (using a ruler and paper trimmer- the panels didn't come with the cameo file) and again punched them with the border punch.


I was really happy with how these came out, and since I went minimalist on the card and box to highlight the flower, they really didn't take very much time.  In fact, after I made these I went back and bought more 3D flowers by the same artist because they were so fun and easy.

Here is the entire list of stops for day 1
Nana @ My Crafting Channel
Pam @ Scrap N Sew Granny
Kim @ Kim's Card Corner
Theresa @ Scrappers Anonymous
Julie @ Muddy Paws & Inky Fingers
Jessi @ My Life in Arts N Crafts
Robin @ The Cricut Scrapper
Kate @ Kate's Paper Creations
Becky @ Becky's Craft Place
LeeAnn @ Snappy Scraps
Becky @ My Paper Craze

Some of the Design Team has Candy.
Please note the ones that have candy set their own requirements for a chance at winning their candy.
Winners will be be announced by each offering candy on
May the 6th at NOON EST
On their blogs.


Pin It

Wednesday, April 9, 2014

Quick and simple happy birthday card

Since I somehow managed to have my computer die, load all of my crafting stuff onto a new computer, and then have that computer die the next day, the prospect of crafting and/or posting anything new this week is looking bleak. So today, from my phone, I bring you this post from my emergency saved drafts. :/

I just wanted to share an idea with you for when you need a quick and simple (and possibly masculine) card, like say when your husband tells you "we need to send a birthday card today for my grandpa's birthday Wednesday."  Hypothetically.

This is an image from the Silhouette store that I believe was one of the free files that comes with your machine.  It's shaped as a tag, so I released the compound path and deleted the outside edge.  That left it as just the circle and words.  Then I drew myself a rectangle in the size that I would make a mat for an A2 card and put it around the image.  That way, it all cut into one piece!  I used some patterned paper from Recollections and just adhered it straight to the card base and voila!


Pin It

Thursday, April 3, 2014

Happy Birthday!

It's Thursday!  Even better, my morning at work got cancelled today, so I had some time to get into my craft room and create.  It felt great to get my hands dirty again.  :)

I'm working right now on finishing up all of the birthday cards for the next two months until our families' birthday seasons are over.  I made this card on a navy card base, with some patterned paper from the Trendsetter 6x6 pad.  I cut this paper airplane from the Silhouette Online Store.  I didn't have any scraps of grey paper, and didn't feel like cutting into a 12x12 for two tiny strips, so I cut all of the pieces in white and colored them in with my Bic markers.  I used my uniball pen to draw lines behind it to show it flying.

I punched two tags from a scrap of red paper, and put the small one at the top of the card and the big one at the bottom.  On the bottom one, I stamped a sentiment from Pink by Design's Scripted Year on the tag.  On the top, I used a white button that I colored navy with another Bic marker and tied with some twine.


I'm entering this card into the following challenges:
Craftin' Desert Divas-Anything Goes
Simon Says Stamp- Wednesday Challenge, Happy Birthday!
Pin It

Thursday, March 13, 2014

Doily card

It is Thursday already?  This week has flown by!  I'm getting prepared to start a new job (I guess I've started, technically, but I don't get paid for the work I'm doing this week) and with all of the trips back and forth to my new office to get everything set up, I'm getting all discombobulated.  I had gotten used to all my time in my craft room.  I'm sure once I get used to living on a schedule again everything will calm down, but until then I'm happy I managed to snag a little while to make this card.

My mom's birthday is coming up so when I saw the challenge at Simon Says Stamp for a card for a special lady, I thought it was a great time to make her birthday card.  I wanted to use some new supplies, so first I pulled out the Maggie Holmes embossing folder and embossed some white cardstock.  I don't think I'll ever get tired of the look of embossed white cardstock.  Next, I put some gold washi tape along the middle of the card.  I used We R Memory Keepers gold, and layered the two slimmer tapes in a row of three.  When I saw that the gold washi tape had arrived at my Local Scrapbook Store, I hustled right over there and bought them all (...and possibly a few sheets of the gold vellum from that collection...and a ton of other stuff too.)

The doily that's on top of the washi tape I cut with my Cameo.  It's a file from Echo Park (Design ID #32385) that I bought from the Silhouette Online Store.  I removed the cuts in the center of the doily so it would have a solid center.  The shadow was cut on white cardstock and then sprayed with Heidi Swapp Gold spray so it shimmers.  Then I stamped the word "Mom" from an AmyR stamp set in gold ink.  I put the whole thing on a piece of kraft paper.

In person, the gold colors match a lot more closely.  I can't figure out why all of my photos made the stamping look so yellow, but I'm going to blame it on the lack of sunshine to photograph by, because that's what we blame everything on around here right now.  ;)


This card is being entered into the Simon Says Stamp Wednesday Challenge- Mother's Day or Special Girl challenge.
Pin It

Wednesday, March 5, 2014

Special Challenge- Use a Sketch File

"Special Challenge - Use a Sketch File" over at


This is in addition to our regular monthly challenge.

DT members were not required to participate.
We have 8 participating.

Sponsor is:
My Crafting Channel

Winner will receive:
Silhouette Printable Clear Sticker Paper

For your inspiration I created this


Welcome to our special challenge!  I've had the sketch markers for my cameo for awhile- I got a few in the package when I bought my Cameo and my husband got me another pack for my birthday last year.  I used them once to see how they worked and then they got stuck away, which is so sad because they're really fun.  That's why I was so happy to see that we were having a special Sketch pens challenge!

For this challenge, I decided to use this beautiful tulip I found in the Silhouette Online Store.  It was an extra challenge for me, because I realized I wanted to use two different pens and had no idea how to!  I’m sure there’s a very easy way to do it, much easier than what I ended up doing.  I ended up using the Divide feature to split the image.  Then I grouped the pink part and grouped the green part.  Then I moved the pink part off the mat, drew the green, moved the pink back into place and the green off the mat, and drew the pink part.  Like I said, I’m sure there’s an easier way- but this way worked!
After that I just cut the white cardstock down, cut some green patterned paper to go behind it, matted it on the pink card, and added the gems.  So easy, but so cute!

If you have sketch pens or have been wanting a reason to buy them, join us in this special challenge!  There will be more special challenges periodically throughout the year to help us use up those Silhouette goodies that we get and then forget to use, so keep an eye on the blog!

Now hop on over to see what my DT sister have created for you inspiration and to link up your Sketch File projects.

CLICK HERE


Pin It

Friday, December 20, 2013

Santa mug hot chocolate gift

Around this time of year, do you ever feel like you need a gift that you can mass produce easily and quickly?  I think I've found my solution to this.  I found this Santa mug in the Silhouette store during their recent sale.  It's sized perfectly to slip a pack of hot chocolate into.  It's just a few easy cuts, and you can jazz it up with some embellishment (I did some stickles on Santa's belt buckle) or you could leave it totally plain.  I really like that you could leave the layers off of this and it could be a mug for any occasion- different paper would make it totally different, and you could even use different packets like chicken soup mix or something.  The sky's the limit! 

When I give these for real, I'll find some fancier packs of hot chocolate than just ones that I had in my cupboard, but I slipped one in anyway so you could see that it fits. 


This project is being entered into the following challenges:
Cameo Creations- Santa Claus is coming to town
Pin It

Thursday, October 3, 2013

Cupcake stand

Hello friends!  I'm back at you, live with the first project I created in my new craft room!  I have one more corkboard to get hung on the wall, and then I'll take a few pictures and show you where I'm creating.  I'm still experimenting with where the best light for taking pictures will be here.  We get a lot of sunlight throughout the day, which is  nice.

Anyhoo, here's my card.  I used a white card base with some pink polka dot paper from Simple Stories.  I layered a strip of bright blue over that for some contrast, and then put the cupcake stand, which is from the Silhouette Store, on.  I stamped the sentiment with Jaded Blossom's "Hey Cupcake" set.  The cupcakes are glittery from some Stickles.  As you can tell from the shadows, I used some foam adhesive to put the cupcakes on the stand.  I thought about adding something else so it wasn't so plain, but nothing else that I tried looked right, so I decided to call it a day.  It's time to start beefing my birthday stash back up a little, because soon it will be Christmas card season and directly after that is a rush of family birthdays for about 4 months straight. 


This card is being entered into the following challenges:
Craftin Desert Divas- Anything with a Sentiment

Pin It

Tuesday, September 24, 2013

Two peas in a pod

Hello out there!  Today is the day that I have to start packing my craft room up into boxes, so the next week's worth of posts will be pre-scheduled posts of projects I made awhile ago.  Enjoy!


I cut this image that I bought from the Silhouette Online Store the very day I opened my Cameo, and then I just had to make a card with it! I had the good luck of getting my Cameo- and the $10 gift card for images- right when the store was having their half off everything sale, so I got a lot of cute images to play with right away. I put it on some paper from a MME six by six paper pad with a little strip of paper from a Recollections paper pad I won.  Then I added a little button in the top corner and voila!  A quick and easy (and cute!) card that I can put into my stash and actually use, which has been one of my biggest crafting goals of 2013. 


Pin It

Monday, July 22, 2013

Silhouette Challenges CH#3 "Faux Stitching"


It's time 
for another Challenge over at

A blog dedicated to the Silhouette Cutting Machines.
You MUST use a Silhouette somehow in your project.

Ch# 3 Faux Stitching
Begins: Monday, July 1
Ends: Wednesday, July 31

Sponsors this month are:
Prize: GC
Digi Pack (Winner's Choice)


There's still plenty of time for you to join us for July's challenge at Silhouette Challenges!  Our challenge for this month is to use your Silhouette machine to add faux-stitching to your project.

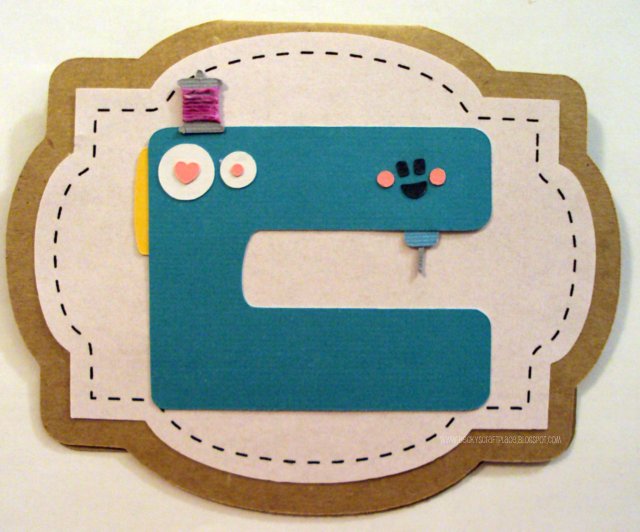
For my project, I made a shaped card using cuts from the Silhouette store.  The card base and mat was made with a shape that came free with my Cameo.  I took out the dots that were initially with the shape and added in the faux stitching instead, and then made the shaped card with an offset. I filled the shape with a Lettering Delights patterned paper using my Silhouette and printed and cut it out.

The sewing machine is a different cut from the Silhouette Store.  I cut all of the pieces out (it was a tad small, so I had to remember to use thinner cardstock where possible) and assembled it.  I didn't like the way the eyes were cutting, and I happened to have tiny bits all over my table from a film strip that I had just cut out of the same shiny black paper, so I subbed in those for its eyes.  I colored a piece of white string with a pink marker and then wound it around the spool for a little bit of a touch of embellishment.


ALSO- if you aren't sure how to use your Silhouette to do faux-stitching, there's a great tutorial here. It's the one  I watched to learn how! 
Pin It

Wednesday, July 17, 2013

Painter's Palette card

Good morning!  I have a super sparkly card to share with you today.  It's a little larger than my normal size, measuring in at about 6.5 x 5 inches.  The background paper is from my Amy Tangerine- Sketchbook 6x6 paper pad.  I wanted to make sure there were watercolor splotches from more colors, so I added a little purple to the bottom left corner and a little yellow to the bottom right.  I put the black polka dot washi tape down the center to hide a seam in the paper- there was a bit of a pattern showing in the bottom left corner, so I covered it up with the scrap that I cut off the paper.  The other seam is covered up by the paintbrush.  Sneaky, I know.

The image is cut from the Silhouette Online Store.  A tip: keep a careful eye on the eyes and mouth.  My guy's mouth got away from me after I had already put my Cameo away, and I spent some time on the floor with a flashlight until it was found.  I inked up the paintbrush and palette with some Distress Ink, trying to make it look a little more used.  Each of the colors of paint has been covered with a matching color of Stickles to really make it sparkle.  You know I love some sparkle!

The sentiment in the top corner is from Pink by Design's "Bracketful" set. 


This card is being entered into the following challenges:
Cameo Creations- Glitter it Up
Pin It

Friday, July 5, 2013

A little ladybug

Hello friends!  I hope you're all having a happy holiday weekend if you're in the USA or are just as excited for a fun weekend if you're living elsewhere.  :)  I've had a busy, busy week and the weekend will be just as busy, so I decided to schedule you a post today of a simple card I made when I was learning how to use my Cameo.

I bought this cute little ladybug from the Silhouette Online store and cut it when I was practicing using my Cameo.  Then I cut some paper from a MME six by six paper pad and adhered it to a blue card base.  When I am ready to use it, I plan to stamp a sentiment on a little tag in the bottom panel, depending on what I plan to use it for!  Easy peasy!


Pin It