Happy weekend! At my house, my husband is spending the day working on the floor in our family room which means that I am spending the day in my craft room. I decided to look through some of the challenges that were open right now and make a fun card!
I started with this super cute Root Beer Float file from Pretty Paper, Pretty Ribbons. Instead of sprinkles, I put some gems on the whipped cream part and I used some Stickles on the red straw. Then I made the background, following the sketch provided by Die Cuttin Divas (see the link below if you want to see the sketch) and following the color scheme of the float. I stamped the sentiment from Jaded Blossom's Simple Sayings 3 and then added the buttons on the bottom for an embellishment.
It's been awhile since I made a card that incorporated a few challenges, because most of my crafting has been focused more on the memory-keeping side lately, and it felt good to stretch these creative muscles again. I'll have to remember to do it more often. :)
I'm entering this card into the following challenges:
Pretty Paper, Pretty Ribbons- Yummy
Simon Says Stamp, Wednesday Challenge- Make it Sparkle
Die Cuttin' Divas- Sketch Challenge
Showing posts with label Pretty Paper Pretty Ribbons. Show all posts
Saturday, August 9, 2014
Friday, June 27, 2014
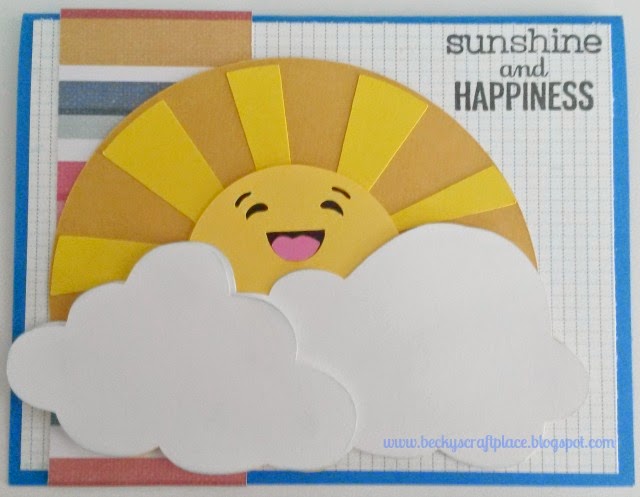
Sunshine and Happiness
This sunny card just reflects how the weather's been lately for us. Sunny and not-too-hot...just the way I like it!
The image on the card is cut from a file by Pretty Paper, Pretty Ribbons. I popped one of the clouds on foam squares to give it a little dimension. The patterned paper I used was from my scraps bin, which is always a plus, and the stamp is actually from one of the dollar stamps that I impulse buy from time to time when I'm in line at Michaels or Joanns. I thought it was a pretty accurate sentiment for this happy sunshine.
I'll be entering this card into the Anything Goes challenge at Simon Says Stamp's Wednesday Challenge blog.
The image on the card is cut from a file by Pretty Paper, Pretty Ribbons. I popped one of the clouds on foam squares to give it a little dimension. The patterned paper I used was from my scraps bin, which is always a plus, and the stamp is actually from one of the dollar stamps that I impulse buy from time to time when I'm in line at Michaels or Joanns. I thought it was a pretty accurate sentiment for this happy sunshine.
I'll be entering this card into the Anything Goes challenge at Simon Says Stamp's Wednesday Challenge blog.
Monday, November 25, 2013
Smashing birthday
Happy Monday! Tomorrow is my husband's birthday, and since I know he doesn't read my blog I feel like it's safe to post his birthday card here today. :) We both really like comic book movies, so I thought this year I'd make him a mean, green, birthday card. I bought the Superheroes set from Pretty Paper, Pretty Ribbons back as soon as I got my Cameo, but haven't had the opportunity to use it as much as I would like. Until now.
I cut our hero from cardstock and pieced him together- it was really pretty easy which is always a plus for me. I used some 6x6 papers for my background papers and one of the chipboard buttons I've had on my desk as a top corner accent.
For the sentiment, I mixed together two stamp sets. The "wishing you a" part comes from Joy's Life Everyday Occasions, and the "SMASHING birthday" is from Lawn Fawn's Jessie's ABCs.
I'll be entering this in Pretty Paper, Pretty Ribbons' challenge for this month, which just so happens to be superhero themed!
I cut our hero from cardstock and pieced him together- it was really pretty easy which is always a plus for me. I used some 6x6 papers for my background papers and one of the chipboard buttons I've had on my desk as a top corner accent.
For the sentiment, I mixed together two stamp sets. The "wishing you a" part comes from Joy's Life Everyday Occasions, and the "SMASHING birthday" is from Lawn Fawn's Jessie's ABCs.
I'll be entering this in Pretty Paper, Pretty Ribbons' challenge for this month, which just so happens to be superhero themed!
Wednesday, October 23, 2013
Fall treat bag
Today I've got a fun and delicious treat bag to share! I made this treat bag using a file from Pretty Paper, Pretty Ribbons called "Oval Window Treat Bag." I cut the bag out of some paper from a KI Memories stack, and then decided to cut the oval with blue as a contrast to the tree. I totally cheated on the clear part of the oval, since the kisses were wrapped anyway, and used a piece of the packaging from a collection stack I had gotten in the mail that morning and hadn't thrown away. It worked!
I also cut the super cute tree from Pretty Paper, Pretty Ribbons- this file was called "Autumn Tree." It was super easy to piece together, but it looks really complicated once it's all together. After I was all finished and was cleaning up, I found out I'd missed one of the layers that had slid under another piece of paper, but you totally wouldn't be able to tell if I hadn't just confessed, right? I love that.
I spent a really long time trying to get a picture that showed it was a gift bag, and also where I wasn't blocking all of the light. It's been really dreary here lately (Except today, of course, after I'd already eaten *all* of the pumpkin spice kisses. That will teach me to enjoy my crafting props before loading the pictures to the computer. I just couldn't help myself, they're really good!) so I've been without natural sunlight mostly.
I'm entering this treat bag into the Autumn Harvest challenge at Pretty Paper, Pretty Ribbons.
I also cut the super cute tree from Pretty Paper, Pretty Ribbons- this file was called "Autumn Tree." It was super easy to piece together, but it looks really complicated once it's all together. After I was all finished and was cleaning up, I found out I'd missed one of the layers that had slid under another piece of paper, but you totally wouldn't be able to tell if I hadn't just confessed, right? I love that.
I spent a really long time trying to get a picture that showed it was a gift bag, and also where I wasn't blocking all of the light. It's been really dreary here lately (Except today, of course, after I'd already eaten *all* of the pumpkin spice kisses. That will teach me to enjoy my crafting props before loading the pictures to the computer. I just couldn't help myself, they're really good!) so I've been without natural sunlight mostly.
Wednesday, July 24, 2013
Summer Balloon
Summer is certainly in full swing here! I'm pretty excited for a hot air balloon festival that is happening in a couple of weeks in a neighboring city. The great thing about moving to a new town is getting to do all the fun, new things that happen in the summer here!
In honor of the hot air balloon festival, I decided to make this card. I used some cloud paper from the Echo Park "Let's Picnic" line. I saw it at my local LSS and knew it was too cute to pass up! The balloon is cut from the "Patriotic Balloon" cutting file from Pretty Paper, Pretty Ribbons. Instead of cutting it in patriotic colors, I picked some bright colored polka dot paper from a stack by Paper Studio. Then I cut out one of the clouds from the Echo Park paper and layered it on foam squares in front of the balloon to make it look like it was flying through the clouds.
Paper Playtime- Use Patterned Paper
Krafty Girls- Anything Goes
In honor of the hot air balloon festival, I decided to make this card. I used some cloud paper from the Echo Park "Let's Picnic" line. I saw it at my local LSS and knew it was too cute to pass up! The balloon is cut from the "Patriotic Balloon" cutting file from Pretty Paper, Pretty Ribbons. Instead of cutting it in patriotic colors, I picked some bright colored polka dot paper from a stack by Paper Studio. Then I cut out one of the clouds from the Echo Park paper and layered it on foam squares in front of the balloon to make it look like it was flying through the clouds.
This card is being entered into the following challenges:
Pretty
Paper, Pretty Ribbons- Summer Fun Paper Playtime- Use Patterned Paper
Krafty Girls- Anything Goes
Tuesday, July 2, 2013
Get Well Slider card
I was thinking about what kind of Get Well card I could make for the first challenge over at Pretty Paper, Pretty Ribbons (the link to the challenge is at the bottom of my post) and I remembered all of the slider cards that I've been seeing all over the internet, and I thought that the bottle from Happy Pills would be a fun slider card! So, I pulled out my Cameo and got to designin' and here's what I came up with:
First, I took out the layers that made the faces. Then, I added an extra copy of the bottle itself. For the slider, I just added an internal offset, made it the size I wanted, and removed a few points to make it smooth. I ran into a bump in the road when I realized that the cap was supposed to adhere to the top of the front layer, but solved it by cutting off the part that the cap adheres to from the front layer. Then I just glued it directly to the back layer while leaving a slit for the slider card to go in.
All of my stamps are by Pink by Design. I liked them both and couldn't decide, so I used the bigger one for the label on the outside of the bottle and the smaller one for the slider within.
I'm entering this card into the following challenges:
Pretty Paper, Pretty Ribbons- Get Well
First, I took out the layers that made the faces. Then, I added an extra copy of the bottle itself. For the slider, I just added an internal offset, made it the size I wanted, and removed a few points to make it smooth. I ran into a bump in the road when I realized that the cap was supposed to adhere to the top of the front layer, but solved it by cutting off the part that the cap adheres to from the front layer. Then I just glued it directly to the back layer while leaving a slit for the slider card to go in.
All of my stamps are by Pink by Design. I liked them both and couldn't decide, so I used the bigger one for the label on the outside of the bottle and the smaller one for the slider within.
I'm entering this card into the following challenges:
Pretty Paper, Pretty Ribbons- Get Well
Monday, June 24, 2013
No place like home
Howdy everyone! It's time for another challenge at Pause, Dream, Enjoy Challenges and it's one of everyone's favorites: Anything Goes!
I made this card using both my Cameo and my Cricut. Using my Cameo, I cut the center step card, layers, and banner from a file from Pretty Paper, Pretty Ribbons. It was a free file, but now it's in the .99 store. Well worth it! I mostly used plain cardstock, and the gingham paper is from the Basics stack from Paper Studio.
So...if you get a chance to make ANY crafts this week, link them up with us at Pause, Dream, Enjoy. Anything goes!!! This challenge will only be open for one week!
This will be my last challenge as a Design Team member with Pause, Dream, Enjoy Challenges. I've very much enjoyed my time on the DT and getting to know the other fabulous crafters who I have worked with, and am so thankful for the opportunity to have worked with them all. They'll be continuing to have challenges under a different format, so I hope you continue to stop by and see all of the wonderful creations that they have for you!
I made this card using both my Cameo and my Cricut. Using my Cameo, I cut the center step card, layers, and banner from a file from Pretty Paper, Pretty Ribbons. It was a free file, but now it's in the .99 store. Well worth it! I mostly used plain cardstock, and the gingham paper is from the Basics stack from Paper Studio.
Next, I cut the mat with my Cricut
from the Elegant Edges cartridge. The same paper pack from Paper Studio
had a piece of plain paper in the same color scheme as the gingham, so I used
that for the shadow and plain white cardstock for the actual mat. I cut
the shoes from Wall Decor and More. I used some burgandy Stickles to line
the shadow of the shoe and filled the rest of the shoes in with Christmas red
Stickles.
To finish off the card, I stamped
the saying "There's no place like home" with my Jessie's ABCs stamps
from Lawn Fawn.
So...if you get a chance to make ANY crafts this week, link them up with us at Pause, Dream, Enjoy. Anything goes!!! This challenge will only be open for one week!
This will be my last challenge as a Design Team member with Pause, Dream, Enjoy Challenges. I've very much enjoyed my time on the DT and getting to know the other fabulous crafters who I have worked with, and am so thankful for the opportunity to have worked with them all. They'll be continuing to have challenges under a different format, so I hope you continue to stop by and see all of the wonderful creations that they have for you!
Wednesday, June 5, 2013
Father's Day Cards
Today I'm sharing this year's Father's Day Cards. I used a dark blue card base layered with a piece of grey cardstock that I embossed with the Diamond Plate Cuttlebug folder. I used three cut files from Pretty Paper, Pretty Ribbons' "Tool Time" file- I love that you can either use the silly faces or not, if you want them to be more serious. The tools I cut with my Cameo.
The ovals are cut with the Cricut from George and Basic Shapes. I stamped both the orange oval and the inside paper with stamps from AmyR Stamps.
This card is being entered into the following challenges:
Cut
it Up Challanges- Father’s Day
Simon
Says Stamp Challenge- Masculine/Fathers Day
Subscribe to:
Posts (Atom)