When you're my age, you tend to get invited to a lot of baby showers. Here's a cute card I made using the Baby Steps Cricut cartridge and a stamp by Jaded Blossom.
To get full glitter coverage on the baby's onsie and bow, I ran them through my Xyron for adhesive. Then I just glittered them up with American crafts glitter! Easy peasy. I love to use this cut with glitter. I've done this on the boy cut from the same cartridge, with blue glitter, as well.
The cheeks were cut in peach and have pink chalk on them. I could have cut them out of pink paper, but I had just picked up a set of chalks and wanted to try them out. It was pretty fun!
The border running up the left side is from Doodlebug Design. I have 4 sets of borders that I bought for some scrapbooking projects and I also use them on cards, on occasion.
I'll be entering this card into the Simon Says Stamp Wednesday Challenge- Glitter it!
Showing posts with label Baby Steps. Show all posts
Wednesday, March 19, 2014
Wednesday, July 31, 2013
Birthday Bear
I've been trying to use lots of varied cuts from my Cricut lately. I found this cute little bear on the "font" feature of the Baby Steps cartridge and wanted to use it. I know enough people who had babies recently, I guess I'll need to save this for one of them turning 1 next year. :)
There was no shadow for the bear, but luckily the black layer is a blackout so I was able to cut two of that and adhere them together. I cut the bear at 5 inches, which was a good size for a card, I think. I used some Icicle Stickles on the yellow layers and Lavendar Stickles on the number 1 (which I had already colored over with a darker shade of purple- it cut in the same purple as the rest of the bib and I didn't feel like cutting the whole thing over again just for the one number). I put a purple button on the top of the birthday hat. To finish it off, I gave him a shiny nose with some Glossy Accents.
This card is being entered into the following challenges:
Craftin
Desert Divas- Birthdays
Friday, May 10, 2013
Polkadot butterfly
Today's card is CAS and small- sometimes I just need to have small cards that I can pop onto a gift, which was my motivation for this small 4x4 card. I started out with the color palette from the Jaded Blossom monthly challenge- that's how I got my brown card base, teal background paper, and red color for the butterfly (also, my awesome JB "Happy Birthday" stamp from the Puppy Love set!)
I also wanted to include this card in the CAS-ual Friday's Tic Tac Toe challenge, so I chose the column of "polka dots/ square card/birthday." If you know me, you know that I can't resist polka dots, so that was a no brainer! When I saw the Simon Says Stamp Challenge to have something with wings is when the card finally came together. Butterflies are super cute and can be pretty simple to put together, which is a plus when you're planning on making a bunch of a card. I found this butterfly on the Baby Steps cartridge and only used the base layer and the body, and then drew a little face on with gel pens. The butterfly was cut at 2 1/4 inches.
| I seriously can't wait to have natural light to take my pictures in again! |
I'm entering this card into the following challenges:
CAS-ual Fridays-
Tic Tac Toe
Jaded
Blossom- Color Challenge
Simon
Says Stamp Challenge- Things with Wings
Friday, April 12, 2013
Baby Shower
I made this card for a baby shower for a friend from church.
I decided to make this card with the little baby sleeping on the cloud. I cut her bow and onsie in pink, which meant that pink on the background might have been too much. I decided that light purple was just right for the patterned paper and the strip that I put the stamp on. I used Lawn Fawn stamps (Jessie's ABCs) to stamp the sentiment. Her nose cut too small, so I just outlined it with a clear gel pen.
A tip: When I cut the girl from Baby Steps, I wanted the picture to almost fill the card. I cut the main image at 4 inches to start with, and it made the baby 4 inches! I forgot that the size you set goes with the main image, and since in this case the baby is the main image and the moon doesn't show up until Layer 2, it goes by how big the baby is. I ended up switching to cutting it at about 2 inches and it fit on the card perfectly.
I decided to make this card with the little baby sleeping on the cloud. I cut her bow and onsie in pink, which meant that pink on the background might have been too much. I decided that light purple was just right for the patterned paper and the strip that I put the stamp on. I used Lawn Fawn stamps (Jessie's ABCs) to stamp the sentiment. Her nose cut too small, so I just outlined it with a clear gel pen.
A tip: When I cut the girl from Baby Steps, I wanted the picture to almost fill the card. I cut the main image at 4 inches to start with, and it made the baby 4 inches! I forgot that the size you set goes with the main image, and since in this case the baby is the main image and the moon doesn't show up until Layer 2, it goes by how big the baby is. I ended up switching to cutting it at about 2 inches and it fit on the card perfectly.
Friday, November 9, 2012
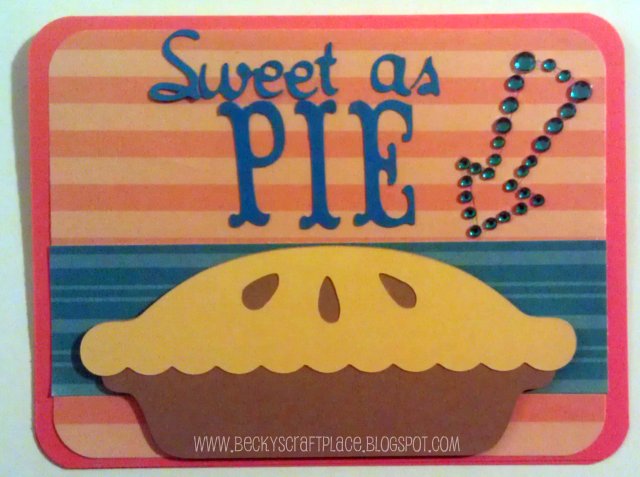
Sweet as Pie
Happy Friday, everyone! How are you all doing this fine, fall day? Since it's Friday, it's time for another challenge at Pause, Dream, Enjoy Challenges! This week's challenge is:
Question: Are you planning a
feast this month or attending one?
Theme: FOOD & BEVERAGE
PROJECTS THIS WEEK
I will be attending a few feasts this month. I always especially look forward to having Thanksgiving with my parents and sister, because they have all the old goodies that remind me of Thanksgiving as a child. I look forward to the day when I might be the one preparing Thanksgiving dinner, but it won't be this year!
To represent this year's feast, I picked one of my favorites- apple pie! It's cut from Create a Critter 2. It only has two layers, because it's one of the accessory cuts. I was feeling in a bright and cheerful mood that day, so I picked orange and blue as background colors.
The "Sweet as" sentiment was cut from Baby Steps at .5 inches. The "Pie" is cut from Storybook at 1.25 inches. Then I added the blue bling arrow, which was sent to me in a prize pack that I won from Exploring Cricut.
So, ARE you going to any feasts this fall? While you're waiting for the tryptophan to wear off, go over and visit Pause, Dream, Enjoy Challenges. There's DT inspiration all over the place over there! Then head to your craft space and make something to play along!
Wednesday, November 7, 2012
Spa bear
I really like all the occasions the bears can dress up for on Teddy Bear Parade. This bear is getting ready for a spa day. I cut her at 3.5 inches. The rubber duck is on a foam dot for added dimension.
This card is actually based off of a sketch. There are multiple layers, although it's kind of hard to tell from a picture. The first layer is the white base. The next layer is the burgandy paper, and the next layer is the pink and white stripes. Next is the oval (cut at 3.5 inches from Baby Steps), which is on a paper with a very faint diagonal stripe. Then the bear and the tag. I put some pearls in the four corners.
The sentiment on the tag is from Scrappy Moms Stamps set "Raining Cats and Dogs." I just cut out a rectangle around the sentiment and then chomped off the corners with a punch.
This card is being entered into the following challenges:
Scrappy Moms Stamps- Teddy Bear Picnic
Die Cuttin' Divas- Sketch Challenge
Monday, September 10, 2012
Some scrapbook pages
This past weekend, I finished Sophie's second 8x8 scrapbook. Don't worry, I have two more empty 8x8 albums waiting for her! I decided to try scanning the pages instead of photographing them, so we'll see which I like better. The first one came out kind of crooked, but I already turned off the printer so I'm not going to re-scan it...it's a learning curve. I'm a pretty simple scrapbooker, usually I don't put a lot of embellishment on a page. It shocked me when I started writing down all of the different companies and products that I used per page.
Here's the first one. It's the one that I scanned crooked. It's an Instagram picture that I took of my husband and Sophie both passed out on a Sunday afternoon after we'd gone for a walk in the park. All of my background cardstock is Bazzill. I bought it in 8.5x11 and cut it down to 8x8. I use the leftovers as embellishments on other pages. The green patterned paper, vellum, and diecuts are from Deja Views Dog Days pack. The journalling card and date card are from Max and Whiskers by Basic Grey. Along the bottom, you might spot my Ek Success paw print border punch being used on a piece of kraft cardstock!
This is the page that faces the previous one. I always use the same color of cardstock on facing pages in Sophie's scrapbook, even if they are a one page layout. It's just something I chose to do and have followed up on. Here I used a chipboard die cut as the title again. I can't remember the brand, because I got it at Hobby Lobby before I cared about brands and took it out of the packaging. The same with the 3D bone at the bottom of the page. The washi tape strips on the top and the bottom are from the Target brand washi tape. I took that little design tip from my very favorite scrapbooking superhero, Glitter Girl. :) I again used some of the die cuts from the Dog Days stack here and there. I also used a strip of paper that had been embossed with the Crafts Too "Bone and Paw Print" embossing folder.
Here's the first one. It's the one that I scanned crooked. It's an Instagram picture that I took of my husband and Sophie both passed out on a Sunday afternoon after we'd gone for a walk in the park. All of my background cardstock is Bazzill. I bought it in 8.5x11 and cut it down to 8x8. I use the leftovers as embellishments on other pages. The green patterned paper, vellum, and diecuts are from Deja Views Dog Days pack. The journalling card and date card are from Max and Whiskers by Basic Grey. Along the bottom, you might spot my Ek Success paw print border punch being used on a piece of kraft cardstock!
My second page is about a day when I came into my scrapbook room and caught Sophie gnawing on some scraps of cardstock that I had left on the floor. This page is full of different companies! The photo mat is from DCWV Pets mat stack. The die cut that I used as a title is from a garage sale, so I don't know what company it is. The bone that says Yum was cut from cardstock with my Cricut and Paper Pups. Down in the bottom corner are two diecuts from the Dog Days pack and the little dog is from that Max and Whiskers set. The brad that is the middle of the two flowers is from WRMK. The strip of paper that I used along the bottom is from the old DCWV Scrapbook kit in a stack- Dog.
This is the page that faces the previous one. I always use the same color of cardstock on facing pages in Sophie's scrapbook, even if they are a one page layout. It's just something I chose to do and have followed up on. Here I used a chipboard die cut as the title again. I can't remember the brand, because I got it at Hobby Lobby before I cared about brands and took it out of the packaging. The same with the 3D bone at the bottom of the page. The washi tape strips on the top and the bottom are from the Target brand washi tape. I took that little design tip from my very favorite scrapbooking superhero, Glitter Girl. :) I again used some of the die cuts from the Dog Days stack here and there. I also used a strip of paper that had been embossed with the Crafts Too "Bone and Paw Print" embossing folder.
Here's the last page in Sophie's second scrapbook. It's another Instagram sized photo. I took pictures of her in the morning before she went to the groomer and then again in the afternoon when I got her home from the groomer. I used an app on my phone to do a photogrid of the pictures. I used some patterned paper from the same DCWV stack as above and the strip of blue paper is a scrap from making another page into an 8x8. The title was cut with Plantin Schoolbook and Baby Steps and used a couple of parentheses from the Dog Days stack. I also used a piece of vellum from the Dog days stack at the bottom. There's a strip of ribbon along the page that I got from Joann's and a little dog from Paper Pups in the bottom corner. I thought the cute dog with the bow fit on a page about being groomed. See the journaling right on the page? That's another Glitter Girl influence. It was scary, but I did it anyway.
Saturday, July 28, 2012
Where's the summer fun?
I know that some of you are probably looking at this card, and looking at the challenge that brought you here from another website, and being all like "what the what?" Let me explain. I am a big geek. Growing up, I lived in an area where we could see the stars on most nights. In the summer, when it was warm enough to be outside at night, one of my favorite things was to go on my parents' patio and look up at the stars and try to make out the constellations. I admit that when I got my smart phone, the first app that I downloaded was the google app for finding constellations. So, for me, star gazing is actually Summer Fun.
Ok, enough explanation. Let's get to the card! It's a regular A2 card. I just used some dark blue card stock as the background. I cut seven stars from Baby Steps and glued them on in the pattern of the Big Dipper, probably the most recognizable of the constellations. I used a yellow gel pen to trace the line of the constellation, to make it even more recognizable. The tag was cut from George and Basic Shapes, and the sentiment was stamped with Lawn Fawn stamps (what a shock, right?)
The blue striped strip at the bottom is a piece of washi tape from Target, and I used a few miscellaneous green gems to dress it up. On another note- why is it that pictures always show flaws that are totally not noticeable in real life? I swear there are no visible folds in the paper or washi in real life...
I'm entering this card in the following challenges:
Creative Cutter Room- Summer Fun
Celebrate the Occasion- Star Struck
Pile it On- Tag, you're it
Friday, June 22, 2012
A scraplift challenge
Lezlye over at Ink and Paper Creations challenged readers to look at projects that she had done and then use them as inspiration and re-create it in their own style. I LOVED this challenge. It was so fun! I picked this project by Lezlye to recreate.
I'm not really much of a stamper, my cards almost always have Cricut cuts on them, so I knew that would be the first way that I would put my own spin on the card. I broke it down and decided that I needed the main elements: black/green/pink, a girl in green, and a pink heart. Here is what I came up with:
This is a regular A2 card. The patterned paper is old school Dollar Tree paper from when I first started scrapping. I cut the ovals from Baby Steps (I bet you didn't realize that there were cuts on there other than just babies, did you?) and I cut the girl from Baby Steps as well. It took more cuts than it was supposed to, because I wanted her dress to be green instead of pink and because I wanted her cheeks to be pink instead of tan. I popped her up on popdots and "voila!" a card that is totally my style, inspired by Lezlye.
Thursday, May 24, 2012
Scrapbook pages
You know how people have their first kid and they take a zillion pictures, and then the second kid feels left out because by the time they're born the parents are tired of taking pictures all of the time? Sophie is my first kid. I take pictures of her playing, pictures of her sleeping, and pictures of her sitting around. I get so much inspiration from her for scrapbook pages!
This first page is of Sophie reading the Yorkie issues of Dog Fancy. The patterned paper for Sophie's scrapbook is from DCWV Dog Scrapbook kit in a stack. I can't remember where the bones embellishment came from. I had to take the foam backing off, because it made the page too puffy. The title is from Sugar and Spice. Yes, I buy baby themed cartridges and use them for layouts for my dog.
This next layout is of Sophie laying on the stairs with her favorite toy, her unstuffed racoon. I used some stickers from the scrapbook stack at the bottom, and the title is made with the fonts from Birthday Bash and Baby Steps. I like having two different fonts, and mixing them is something I want to keep working on.
Finally, we have Wet nose, Warm heart. I'm not really sure what Sophie was doing in this picture, I just liked it. I used the title from Four Legged Friends, but only cut it in two colors instead of four. Then I made the dog charm from Paper Pups. I thought they went together, because the dog in the charm is holding a heart.
Thursday, February 23, 2012
Dry erase board
Pinterest is an addictive thing. I often find things that I think would be really cute, and then tweak them for my own. So, when I saw this board from Craftaholics Anonymous, I pinned it and filed it away.
A few weekends ago, my husband and I were cleaning out the guest room closet (aka where everything gets shoved to get forgotten) and I found a big, black frame with an old joke diploma in it that I didn't need any more. A little goo gone later (to get rid of the label that had been affixed to the front), I had a clean black frame.
To make the white background, I found our thickest wrapping paper and just taped it on backwards. The words were cut with Lyrical Letters. If I could do it again, I would probably make them smaller, but I didn't feel like wasting more black cardstock, because it's like gold in my craft room, so I left it. Everything doesn't have to be perfect, right?
Then I made some roses out of coffee filters that I had dyed with food coloring. I like things to be free as much as possible. I hot-glued them onto the corner. Granted, I don't think mine looks as good as the one at Craftaholics Anonymous, but that's why she's a professional crafter and I'm just tinkering in my craft room. :)
I plan to use it to remind myself of various craft ideas that I've had and occasions that are coming up that I need to make cards for. :)
7/12/12 update:
I am kind of a clutz and ripped a hole through the paper of my board by pushing too hard when I was writing on it. So, off to the Dollar Tree I went and got some white posterboard. In the time between when I first made the frame and when I ripped it, I got Baby Steps, and I absolutely love the font, so I used it on my replacement board. Here it is:
PS- I keep the cute little worm from 9 months on it for decoration. :)
A few weekends ago, my husband and I were cleaning out the guest room closet (aka where everything gets shoved to get forgotten) and I found a big, black frame with an old joke diploma in it that I didn't need any more. A little goo gone later (to get rid of the label that had been affixed to the front), I had a clean black frame.
To make the white background, I found our thickest wrapping paper and just taped it on backwards. The words were cut with Lyrical Letters. If I could do it again, I would probably make them smaller, but I didn't feel like wasting more black cardstock, because it's like gold in my craft room, so I left it. Everything doesn't have to be perfect, right?
Then I made some roses out of coffee filters that I had dyed with food coloring. I like things to be free as much as possible. I hot-glued them onto the corner. Granted, I don't think mine looks as good as the one at Craftaholics Anonymous, but that's why she's a professional crafter and I'm just tinkering in my craft room. :)
I plan to use it to remind myself of various craft ideas that I've had and occasions that are coming up that I need to make cards for. :)
7/12/12 update:
I am kind of a clutz and ripped a hole through the paper of my board by pushing too hard when I was writing on it. So, off to the Dollar Tree I went and got some white posterboard. In the time between when I first made the frame and when I ripped it, I got Baby Steps, and I absolutely love the font, so I used it on my replacement board. Here it is:
Subscribe to:
Posts (Atom)