Wednesday, July 31, 2013

Birthday Bear

I've been trying to use lots of varied cuts from my Cricut lately.  I found this cute little bear on the "font" feature of the Baby Steps cartridge and wanted to use it.  I know enough people who had babies recently, I guess I'll need to save this for one of them turning 1 next year.  :)

There was no shadow for the bear, but luckily the black layer is a blackout so I was able to cut two of that and adhere them together.  I cut the bear at 5 inches, which was a good size for a card, I think.  I used some Icicle Stickles on the yellow layers and Lavendar Stickles on the number 1 (which I had already colored over with a darker shade of purple- it cut in the same purple as the rest of the bib and I didn't feel like cutting the whole thing over again just for the one number).  I put a purple button on the top of the birthday hat.  To finish it off, I gave him a shiny nose with some Glossy Accents.


This card is being entered into the following challenges: 
Fantabulous Cricut- Shape Card 
Craftin Desert Divas- Birthdays             
Die Cuttin Divas- Anything Goes
Simon Says Stamp- Anything Goes

Pin It

Monday, July 29, 2013

Orange you Awesome?

Good morning, friends!  For today's project I made a Kool-Aid packet holder.  I've seen similar things used to gift hot chocolate, but it's just a tad too hot for hot chocolate right now, so I thought I'd make a summery twist on it.

I used the Seed Packet file from SVG Cutting Files and just resized it so that a Kool-Aid packet would fit inside.  I cut it in blue, and then cut out a piece of patterned paper from an MME pad just a tad smaller to fit over it. 

The orange is also from SVG Cutting Files.  The set came with this cute orange, and also a slice and a wedge, both of which can also have cute faces.  Then I hand cut the little banner from a scrap I had and stamped the sentiment from Pink by Design's "Orange you Awesome" stamp set.  Of course, I stamped it in orange! 

Front of the packet
 I slipped the Kool-Aid packet in and closed it with a piece of orange washi tape.

The packet opened up

I'm entering this project into the following challenges:


Simon Says Stamp- Summer Food and Drink 
SVG Cutting Files- Hot Tropics Color Challenge
Pin It

Saturday, July 27, 2013

Two baby cards

I mentioned last week that I am running very low on baby cards, so I decided to use the stroller cut from Cricut Alphabet, which I just bought in digital format when Cricut was having a sale last week.  I'd been wanting it for quite awhile, so I'm pretty excited. 

I decided to make two cards, one in pink and one in blue.  I used some matching patterned paper from Recollections, some pink/blue ribbon, and a matching green button for each.  For the heart cutout spot, each stroller got some Stickles- in Cotton Candy and in Baby Blue.  You can see it better here on the blue card. 


These cards are being entered into the following challenge:


Die Cuttin Divas-Twice is Nice


Pin It

Friday, July 26, 2013

Tennis girl

Hi friends!  Today's sparkly card is brightly colored and very sparkly- just the way I like it!  I used some patterned papers from my stash and some bright ric-rac ribbon.

The cute bear is from an SVG Cuts file called "Taylor's Team."  I used the ice skating bear and just left out her ice skates, then added the tennis racket and ball from the tennis bear (since he's a boy and I wanted it to be a girl bear).  Then I glittered up her outfit with Waterfall and Goldenrod stickles. 

I gave her some googly eyes and her mouth is stamped on.  I used a frowny face stamp from a stamp set by Pink by Design and stamped the mouth upside down, because it was just the shape I wanted. 

The Goldenrod Stickles don't photograph very nicely on the skirt, but look how good the Waterfall Stickles photographed!

This card is being entered into the following challenges:
All That Stickles- Waterfall

Pin It

Wednesday, July 24, 2013

Summer Balloon

Summer is certainly in full swing here!  I'm pretty excited for a hot air balloon festival that is happening in a couple of weeks in a neighboring city.  The great thing about moving to a new town is getting to do all the fun, new things that happen in the summer here!

In honor of the hot air balloon festival, I decided to make this card.  I used some cloud paper from the Echo Park "Let's Picnic" line. I saw it at my local LSS and knew it was too cute to pass up!  The balloon is cut from the "Patriotic Balloon" cutting file from Pretty Paper, Pretty Ribbons.  Instead of cutting it in patriotic colors, I picked some bright colored polka dot paper from a stack by Paper Studio.  Then I cut out one of the clouds from the Echo Park paper and layered it on foam squares in front of the balloon to make it look like it was flying through the clouds. 


This card is being entered into the following challenges:
Pretty Paper, Pretty Ribbons- Summer Fun 
Paper Playtime- Use Patterned Paper
Krafty Girls- Anything Goes

Pin It

Monday, July 22, 2013

Silhouette Challenges CH#3 "Faux Stitching"


It's time 
for another Challenge over at

A blog dedicated to the Silhouette Cutting Machines.
You MUST use a Silhouette somehow in your project.

Ch# 3 Faux Stitching
Begins: Monday, July 1
Ends: Wednesday, July 31

Sponsors this month are:
Prize: GC
Digi Pack (Winner's Choice)


There's still plenty of time for you to join us for July's challenge at Silhouette Challenges!  Our challenge for this month is to use your Silhouette machine to add faux-stitching to your project.

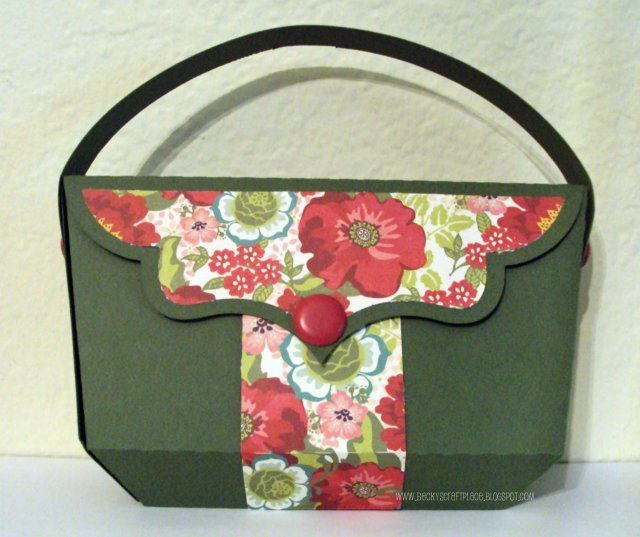
For my project, I made a shaped card using cuts from the Silhouette store.  The card base and mat was made with a shape that came free with my Cameo.  I took out the dots that were initially with the shape and added in the faux stitching instead, and then made the shaped card with an offset. I filled the shape with a Lettering Delights patterned paper using my Silhouette and printed and cut it out.

The sewing machine is a different cut from the Silhouette Store.  I cut all of the pieces out (it was a tad small, so I had to remember to use thinner cardstock where possible) and assembled it.  I didn't like the way the eyes were cutting, and I happened to have tiny bits all over my table from a film strip that I had just cut out of the same shiny black paper, so I subbed in those for its eyes.  I colored a piece of white string with a pink marker and then wound it around the spool for a little bit of a touch of embellishment.


ALSO- if you aren't sure how to use your Silhouette to do faux-stitching, there's a great tutorial here. It's the one  I watched to learn how! 
Pin It

Saturday, July 20, 2013

Anchors away!

The theme of this week's challenge at Simon Says Stamp Challenge was "By the Sea," which seemed really fun to me.  I'm admittedly one of the least watery people you'll ever know.  I know how to swim enough to keep my head above water in case of an emergency, and that's enough for me.  But I still really like the nautical themed things that have been scattered throughout the crafting world lately, I just rarely have a need to use them.  So this was a fun challenge for me.

I decided to make a little set of four 4x4 notecards.  I cut out the black and white cardstock, then picked out two scraps of beach themed patterned paper I had in my stash of scraps- the blue has starfish and the red has crabs on it. 

I cut the anchors and the steering wheels (again- not a water person so I have no idea what those are called) from the Life is a Beach Cricut cartridge.  I liked that they were very simple, which I think works kind of well for smaller notecards like these.


Pin It

Friday, July 19, 2013

Welcome little bird

I realized the other day that although I have quite a prolific stash of birthday cards now, I'm completely out of baby themed cards.  People around me are having too many babies for me to keep up with!  So I thought I'd make a gender neutral baby card to add into my stash.

I cut the birds and the branch both from Zooballoo.  What a fun cartridge that I don't use nearly often enough!  I added some detail to the leaves and to the bodies of the birds with gel pens.  I wanted to add a little dimension, so I strung some of my favorite kraft Trendy Twine around the nest haphazardly.  It made me think of twigs and things that the birds would make their nest out of.

I added a stamp from Jaded Blossom's Simple Sayings 2 in the top corner and three brown pearls in the other corner, and then finished the bottom off with some washi tape.  I have to start using up some washi tape so I have room to buy more!


I'm entering this card into the following challenges 
Krafty Girls- Birds of a Feather
Fantabulous Cricut- Set the Scene
Scrappy Moms Stamps- The Great Outdoors               
Pin It

Wednesday, July 17, 2013

Painter's Palette card

Good morning!  I have a super sparkly card to share with you today.  It's a little larger than my normal size, measuring in at about 6.5 x 5 inches.  The background paper is from my Amy Tangerine- Sketchbook 6x6 paper pad.  I wanted to make sure there were watercolor splotches from more colors, so I added a little purple to the bottom left corner and a little yellow to the bottom right.  I put the black polka dot washi tape down the center to hide a seam in the paper- there was a bit of a pattern showing in the bottom left corner, so I covered it up with the scrap that I cut off the paper.  The other seam is covered up by the paintbrush.  Sneaky, I know.

The image is cut from the Silhouette Online Store.  A tip: keep a careful eye on the eyes and mouth.  My guy's mouth got away from me after I had already put my Cameo away, and I spent some time on the floor with a flashlight until it was found.  I inked up the paintbrush and palette with some Distress Ink, trying to make it look a little more used.  Each of the colors of paint has been covered with a matching color of Stickles to really make it sparkle.  You know I love some sparkle!

The sentiment in the top corner is from Pink by Design's "Bracketful" set. 


This card is being entered into the following challenges:
Cameo Creations- Glitter it Up
Pin It

Monday, July 15, 2013

Summer Wet N Wild at Craftin Desert Divas!


It's week two of the Summer Wet N Wild theme at the Craft It Up and Link It Up Linky Party hosted by Tara of Craftin Desert Divas! Every other Monday will mark the beginning of a new semi-weekly linky party and you could win fabulous prizes! 

There's still time for you to join in! The more you link up, the better chance you have to win.  Visit Craftin Desert Divas for all the rules and to play along.

Here is what I created for this linky party....

For this week's card, I decided to go waaay back.  I pulled out my Cricut and my Paper Pups cartridge!  I love all the images on this cartridge, and I don't use it nearly enough.  The background of the card is fairly simple- I always try to keep is simple with Paper Pups cards because of the way the images are with the thick borders and I don't want too much going on.  I just used two different papers from my huge stash of MME 6x6 pads.  I love the B sides of those papers!  

I cut this adorable dog at 3 3/4 inches.  One of my tricks with Paper Pups is that I always cut the blackout of the image from something in my pile of random scraps that I probably won't ever use, and then as I cut the layers I can adhere them all to the blackout.  Paper Pups layering is different in that all of the layers end up flat, rather than on top of each other, so it helps to have that base. 

My stamp is from Jaded Blossom's Simple Sayings 2.  I thought my pup who was heading to the beach would like me to send some sunshine her way.  :)  I added a little blue flower that I had bought at Michaels for $1 and covered the whole thing in glitter glue.  You know how I like my sparkle!


Hope you will Craft It Up and Link It Up!!!

I'll also be linking this project up at the DL.Art Summer Linky Party.
Pin It

Friday, July 12, 2013

Christmas in July

It is so very not Christmassy here.  It's hot and muggy thunderstorms a couple of times a week.  But, it's never too early to start planning your Christmas crafts, right? 

This card is a 5x5 square card.  It's a white Recollections card base.  I layered a piece of red sparkle paper over it (if you look really hard you can see some sparkle in the picture) and a piece of green chevron paper from my Christmas stash on top of that.  I cut the cute little squirrel from Jolly Holidays at 3 1/4 inches.  I always used to want a pet squirrel, so they have a special place in my heart.  When I was in college I used to feed the fat little campus squirrels straight from my hands.  *memories*

The little sentiment tag is my very favorite, which is on the Sweethearts cartridge.  Both cuts are on foam dots, although the ones behind the sentiment are thicker ones.  I did that so I could stick the two little pins behind the sentiment for some extra embellishment.  To balance it out, I also added three white pearls in the other top corner.


I'm entering this card into the following challenges:
Jaded Blossom- Christmas in July
Cut it Up Challenges- Christmas in July
Simply Create Too- Christmas in July
CardzTV- Chrsitmas in July


Pin It

Wednesday, July 10, 2013

Fabulous tag

Today I've got a tag to share with you.  At our apartment, our power goes out a lot.  What's a crafter to do without access to her Cricut or Cameo?  Well, I was cleaning out drawers and other assorted nooks and crannies where I've stashed craft things, and ran across some old hand cutting templates- including a couple of tags!  So I went old school and hand cut some tags for later use.  This one is on paper from a Basics stack from The Paper Studio (Hobby Lobby's store brand).  I punched the bottom part with a Fiskars edge punch.

I was also able to go through my Cricut handbooks to plan out my cut for the tag, and also add the washi tape (Target brand) to the bottom.  Then, when we had power again, I cut this cute dragonfly out of the Paisley cartridge.

I added some True Blue stickles to his wings, and also some Glam Pink to the hearts on his body.  Then I added two heart shaped gems over the stickled hearts (once they dried).  I stamped the sentiment from a Pink Paislee stamp set and popped the dragonfly up on foam squares.

The finishing touch was adding a little bit of black crinkle ribbon to the top of the tag. 


This tag is being entered into the following challenges:
Krafty Girls- Die Cut
All That Stickles- True Blue
Fantabulous Cricut- Cute as a Bug 


Pin It

Monday, July 8, 2013

Guest Designer- Craftin Desert Divas


I am posting today as a guest designer for Craft It Up and Link It Up Linky Party hosted by Tara of Craftin Desert Divas! Every other Monday will mark the beginning of a new semi-weekly linky party and you could win fabulous prizes!!

This linky party theme is Summer Wet and Wild. There are two sponsors for this challenge:
The Robin's Nest - $10 gift card
 Too Cute By Jessica - $20 gift card
Stamping Rules - Your Choice of CTMH Stamp Set (up to $20 retail)


The more you link up, the better chance you have to win.  Visit Craftin Desert Divas for all the rules and to play along.

Here is what I created for this linky party....


I made a card using the "Fun in the Sun" file from SVG Cutting files.  I started this card kind of differently than I usually do- I found the green background paper in one of my MME 6x6 stacks, paired it with the pink paper that it's behind, and then decided to use the girl with it.  I thought she looked like a girl would would appreciate some sparkle, so I really blinged it up (although some of it you can't see on the picture).  On her bathing suit and flip flop straps, which I cut from a scrap of paper I had in my "Scraps" folder, I traced over the design with glitter gel pens.  I added some Stickles to her towel- first a layer of Fruit Punch, then a layer of Cotton Candy.  I also added the rhinestones to her flip flops.  Her sunglasses were cut out of a shimmery black paper I had, too.  Like I said, plenty of sparkle!

I added the crinkle ribbon and the three rhinestones for a little embellishment, but I didn't think it needed too much because of all of the sparkle on the girl. 

Hope you will Craft It Up and Link It Up!!!

I'll also be entering this card into the June Challenge at SVG Cutting Files!
Pin It

Sunday, July 7, 2013

A handbag project

Many of you may have heard about the handbag promotion going on right now at SVG Cuts.  You can find more info about it here.  Basically, you download a free SVG of a 3D handbag, make it, upload a picture of it to their website, and they'll send you a gift card to their site.  They have awesome files and I was just about to make a purchase there this week, so I was pretty excited about this.  Here's my purse:


I sized the whole thing down just a smidgen, basically only because I wanted the flowered parts all to fit onto one 6x6 page.  It's from the This and That 6x6 pad from Echo Park.  So normally it would be a little bigger, unless you're not cutting with a Cameo- the file also comes with compatible sizes for 6x12 cutters and 8.5x11 cutters.  I used two sheets of the green cardstock for the purse itself.  It was super easy to put together with just a few strategically placed glue dots.  I just looked at the sample picture, but I believe there's a video tutorial for it too.  Then I put the handle on with two pink brads from We R Memory Keepers and put the front brad on as decoration.  It also came with some really cute tassels, but I couldn't find any paper that I liked to go with it, so I decided to leave it plain.  There have been a ton of really awesome bags featured on their Facebook page while the promotion has gone on.  It was so fun!

I'm going to enter this purse in the 3D challenge at 2 Creative Chicks.
Pin It

Friday, July 5, 2013

A little ladybug

Hello friends!  I hope you're all having a happy holiday weekend if you're in the USA or are just as excited for a fun weekend if you're living elsewhere.  :)  I've had a busy, busy week and the weekend will be just as busy, so I decided to schedule you a post today of a simple card I made when I was learning how to use my Cameo.

I bought this cute little ladybug from the Silhouette Online store and cut it when I was practicing using my Cameo.  Then I cut some paper from a MME six by six paper pad and adhered it to a blue card base.  When I am ready to use it, I plan to stamp a sentiment on a little tag in the bottom panel, depending on what I plan to use it for!  Easy peasy!


Pin It

Tuesday, July 2, 2013

Get Well Slider card

I was thinking about what kind of Get Well card I could make for the first challenge over at Pretty Paper, Pretty Ribbons (the link to the challenge is at the bottom of my post) and I remembered all of the slider cards that I've been seeing all over the internet, and I thought that the bottle from Happy Pills would be a fun slider card!  So, I pulled out my Cameo and got to designin' and here's what I came up with:

First, I took out the layers that made the faces.  Then, I added an extra copy of the bottle itself.  For the slider, I just added an internal offset, made it the size I wanted, and removed a few points to make it smooth.  I ran into a bump in the road when I realized that the cap was supposed to adhere to the top of the front layer, but solved it by cutting off the part that the cap adheres to from the front layer.  Then I just glued it directly to the back layer while leaving a slit for the slider card to go in.

All of my stamps are by Pink by Design.  I liked them both and couldn't decide, so I used the bigger one for the label on the outside of the bottle and the smaller one for the slider within.


I'm entering this card into the following challenges:

Pretty Paper, Pretty Ribbons- Get Well
Pin It