Friday, December 28, 2012

Wink!

It's the last Friday of the year!  That means it's also 2012's last challenge at Pause, Dream, Enjoy Challenges.    Our last challenge of the year is:

Question: Are you completely worn out from this busy time of year?

Theme: ANYTHING GOES!


I am always worn out by the end of the Christmas season. With my family and my husband's family, it feels like we're all over the place for the time surrounding the holiday.  I love spending time with our family and friends, but I'm always ready for a break afterward.  

When you're worn out, what better way to relax than a nice, hot cup of hot chocolate?  That was the inspiration for this card.  It's a shape card that I cut from Smiley Cards.  I cut two of the shadow of the cup in black at 3 inches.  Then I did not cut the main image, which would normally be the black that shows through in the face.  There are two different blue layers, and of course the cute cheeks that are characteristic of the faces from Smiley Cards.  

Do you know the easy way to make shaped cards?  You don't necessarily have to use Cricut Craft Room or a Gypsy to weld things.  When you cut two identical copies of the background (in this case, the shadow) cut, you can score part of the back copy, fold it over, and adhere them together.  In this case, I scored about a half inch down from the top of the card and adhered those parts together.


Do you need a crafty break after the rush of the holiday season?  Head over to Pause, Dream, Enjoy Challenges and check out what the rest of the DT has for you.  Then head to your craft space and make something to join us!


Pin It

Monday, December 24, 2012

Pet Sympathy card

I made it into my craft room today, but definitely not for the reason I wanted to.  We got a call last night that my in-laws are going to have to put their family dog, Chloe, to sleep today.  If you've followed this blog for awhile, you probably can guess that I love my own dog Sophie like a child.  It breaks my heart to think of anyone having to face this decision, let alone people that I love.

I used a black card base with white cardstock.  I embossed the white cardstock with the clouds embossing folder by Darice.  Since the folder is vertical and I wanted the card to be horizontal, I had to emboss it twice- the die cuts are covering the areas where you can tell I did that.  For the die cuts I used Paper Pups, with the shadow feature and the main image both cut at 2 inches.  Chloe is a chocolate lab, so I cut the dog in chocolate brown.  I colored in the halo with a Sharpie and then put Stickles over it.


Inside the card, I stamped a sentiment from Scrappy Moms Stamps "Raining Cats and Dogs" set.  


Pin It

Sunday, December 23, 2012

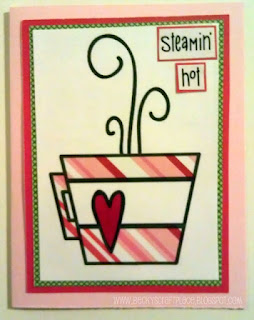
Steamin' Hot

Surprise!  I had some time to get into my craft room this week (although admittedly this card was made in about 10 short crafting sessions instead of doing it all at once.)


This is an A2 card.  I used some pink cardstock as the card, then layered red cardstock and then a green patterned paper from one of my Christmas stacks.  I also used the red cardstock behind the sentiments to make them stand out.

The sentiments and picture are freebies from The AlleyWay Stamps.  I printed the sentiment three times- twice on regular white paper and once on a candy cane striped paper from the same Christmas stack as the green paper.  I paper-pieced the striped paper onto the white paper and colored in the heart with a red Sharpie, then pieced that onto the plain one as well.

I'm entering this card into the Be Inspired challenge at AlleyWay Stamps.  I was definitely inspired by the colors and stripes of their picture this week.
Pin It

Friday, December 21, 2012

Merry Christmas!

Hi bloggy friends!  Happy Friday and happy challenge day at Pause, Dream, Enjoy Challenges!  Today, our challenge is:

Question: Are you celebrating anything this month?

THEME: MAKE ANY TYPE OF CELEBRATION PROJECT


This month, we celebrate Christmas.  When I saw this challenge, I thought that it would be fitting to make a card that didn't have cute little elves or festive animals, but that represented the true meaning of what we celebrate this season: Jesus!

This card is on a kraft base.  I used pastel blue paper for the background, I'm not sure why it came out so bright in all the pictures I took.  I used some off white squiggles that I won in a prize pack from Julie at Cricut Chirp Challenges.  I cut Jesus from Winter Frolic.  His face was too small for me to want to cut his features, so I drew the eyes and mouth on with gel pen and colored in the cheeks with colored pencil.

I stamped the sentiment with My Creative Time's "Gift Card Sentiments."  


What are you celebrating this month?  Come to Pause, Dream, Enjoy Challenges and show us your celebrations!  You can stop by first and check out the inspiration from the rest of the DT ladies, and then get a-craftin'!
Pin It

Wednesday, December 19, 2012

Holiday Clean and Simple Shape Card

Are you all super, super busy right now?  I am!  I feel like my craft room is calling to me, but I just don't have enough time to get into anything too detailed right now.  I REALLY wanted to use my new Winter Woodland cartridge, though, so I decided to go the super Clean and Simple route.

This card was cut at 3 inches.  I started to cut it at 4, but it came out way too long.  I cut two copies of the background shape in kraft cardstock, scored the top of the back one, and glued them together.  Then I cut the letters in green and red and also cut the layers (the holly) in green and red.  I thought it was a little TOO simple, even for what I was going for, so I added some Stickles in Green and Christmas Red to the holly.  They're still wet in the picture....I got impatient.  :)


I'm entering this card into the following challenges:

Paper Playtime- Winter Fun                                                       
Exploring Cricut- The Most Wonderful Time of the Year                
My Craft Spot- Christmas Shape Card                                    
Fantabulous Cricut- Shape Card                                                
Die Cuttin Divas- More Holiday Spirit
Pin It

Friday, December 14, 2012

Snowy scene

Happy Friday everyone!  Time for another weekly challenge at Pause, Dream, Enjoy Challenges.  This week, we're answering the question:


Question: Is it SNOWING where you are? 

Theme: MAKE A PROJECT AND INCLUDE SOME SNOW ON IT

I prefer it to not be snowing.  Let's never speak of it again.  ;)

This card is a bigger card than I normally make.  I wanted to be able to include my whole scene, so I pulled out my biggest envelope, measured it, and worked backwards.  It wound up being 5.5 inches tall by 8 inches across.  I wrapped some snowflake ribbon that I had left over after making a dog treat holder for Sophie a few winters ago for the top.  I got it at Hobby Lobby, but I don't know if they still sell it.

My entire scene is cut from Jolly Holidays.  The house is layered on foam dots, the rest of them are adhered directly to the card.  The house is cut at 5 inches, the tree at 4 inches, the birdhouse and mailbox at 3 inches. It's a simple card in terms of not a lot of background, but with so much detail in the cuts I think the simplicity works.


Time to come on over to Pause, Dream, Enjoy Challenges and make a snowy card yourself!  There's plenty of inspiration to be had by the rest of the design team over at the blog.

I'll also be entering this card in the following challenge:
For Fun Challenges- I'll be Home for Christmas
Pin It

Thursday, December 13, 2012

Jaded Blossom December Challenge

This month, because it's their one year birthday, there's a special Crafter's Choice challenge going on at Jaded Blossom.  I happen to have just ordered four new stamp sets from them and to have *ahem* a few more on my wish list, so I wanted to try some of them out.  This one's going to be a little more picture heavy than most of my posts.


For this project, I made a gift box and six cards.  The gift box was cut from Wild Card at "Fit to Page," which just so happened to be 7 inches with a 12x12 mat.  I used some patterned paper from Paper Studio's "Happy Hootin' Holidays" stack, which I bought at Hobby Lobby to use in my December Daily/Christmas journal.  I cut the liner in green patterned paper from a K&Company pad that I bought at Michaels.   I can't seem to find it online, and I already threw away the evidence of my shopping spree the cover of the pad and all the embellishments (yes, I bought the entire line), but I will update this post if and when I figure it out.  I stamped the postage stamp and sentiment in brown from Jaded Blossom's "Santa Mail" and put it in the top corner.


Next we come to the cards.  Each card is 4 inches square, and the tag on the front is cut from Elegant Edges at 3.5 inches.  All of the twine is hand made.  Each card as a faux front that is 4x4 inches that I used to wrap the twine around, then adhered down to the real front of the card.  These first two cards were made with Jaded Blossom's "Christmas Wishes" stamp set.  I love it!


The wedding dress and sentiment on the grey card are from Jaded Blossom's "Wedding Wishes" set and the tree and sentiment are from their "Simple Sayings" set.

The tree and saying below are, again, from Jaded Blossom's "Simple Sayings" set and the pumpkin and sentiment are from Jaded Blossom's "Thanksgiving Wishes" set.  


Here's the final product, all ready to gift!  I adhered the back of the box together with some washi tape and it's all set!


Pin It

Wednesday, December 12, 2012

Snowman

I'm on something of a nontraditional colors kick this Christmas.  I wish you could see my December Daily/Christmas journal- it's so full of pinks, bright greens, and teals...I love it!  

I cut this little cutie from Create a Critter 2 at 4 inches.  I didn't really think until I had already glued it together that it has a top hat and pink accessories...I guess it's a boy snowman who isn't afraid to show his feminine side.  There are black Stickles on his hat, which you can't really see.  

I used some patterned paper from Paper Studio that is brown, pink, and sea green over kraft cardstock.  Then I put a strip of sea green along the bottom and stamped a sentiment from Pink by Design's "Scripted Year" stamp set.  


I'm entering this card in the following challenges:
Red Carpet Studio Challenges- Frosty the Snowman
Pink by Design- Nontraditional Christmas colors
Pin It

Tuesday, December 11, 2012

Bright Christmas trees

Are you in the Christmas spirit yet?  I'm working really hard this year to try to keep it magical.  Here's a card I made using free digital stamps from Alley Way Stamps.

I printed the trees at 4 inches and colored them with a hot pink and light green Sharpie, then cut them out.  I used the snowflakes Cuttlebug folder on the card base for texture, then put some sheer green ribbon over it for an accent.  You can't tell too well from the picture, but the three trees are adhered to the card using foam adhesive.


This card is being entered in the following challenges:
The Alley Way Stamps- Be Inspired
Little Scrap Pieces- It's beginning to look a lot like Christmas

Pin It

Monday, December 10, 2012

Reindeer card


I've already sent out my Christmas cards, but the ideas just keep coming!  I've always loved this cute little reindeer face from Doodlecharms, but never had a good reason to use him...until I saw that he was this month's challenge cut at Simply Crafts!

This card is made of white cardstock with some patterned paper from The Paper Studio.  I inked both around the edges with blue ink.  The reindeer is cut from Doodlecharms at 4 inches and I inked him with a little brown around the edges.  His mouth is traced with a gel pen and his nose is...wait for it...a Hershey's kiss wrapper!  I like how shiny they are and it gave me a good reason to eat one....or more.  ;)  I just glued it down over the nose that was cut on the cardstock.  That's why it's a little angled on some sides...it was hard to wrap around the cardstock perfectly rounded.

I used some off-white ribbon as an accent, and stamped it with a sentiment from Jaded Blossom's Winter Wishes stamp set.  The pictures makes it seem like the stamp is kind of hard to see, but it doesn't in real life. I couldn't get a picture that showed it well, because every time I tried to use the flash I would get a horrible glare off of Rudolph's shiny nose.  ;)


I'm entering this card into the following challenges:
Simply Crafts- December/ Doodlecharms reindeer      
Play Date Cafe- Mountaintop . . . Icy Blue . . . Snowflake           
Pin It

Saturday, December 8, 2012

Christmas tag


Am I the only one loving the nostalgia of the current polaroid trend?  I went to Michaels the other day and bought frames that are meant to make your regular picture look like a polaroid.  Craziness!  This tag is following that trend.  Sorry for the bad picture- I wanted to get the whole tag in the picture, so it ended up kind of small.

I made this simple polaroid shape on Microsoft Paint.  How 90s of me, right?  But it worked.  Then I pasted in some Paper Smooches digital stamps- the sentiment is one stamp, and the gifts are another.  Well, actually the gifts stamp is a grouping of three.  I flipped it once and then isolated just one of the packages to put in the center. I tried to color them in with sharpie, but I need some finer tipped ones for a project this small (it's about 4x4) so I went with colored pencil instead.  Good thing I had thought ahead and printed more than one.  Coloring is so cathartic on stressful days.

Next I cut it out, adhered it to a piece of patterned paper- can you tell the paper had red stripes from this teeny picture?- and cut it out again.  Then I punched the hole in the top corner and strung ribbon through it.  I kind of wish I had a smaller hole punch so I could have used twine, but it worked out in the end.


I'm entering this tag into the following challenges:       
Paper Smooches Sparks  Polaroids/Camera
DL.Art- Anything Red and/or Green
Pin It

Friday, December 7, 2012

Let it snow

Good Friday to you! Are you ready for another challenge at Pause, Dream, Enjoy Challenges?  This week, we're doing a color challenge:

 Question: Are you decorating this month? What colors are you using?

Theme: MAKE A BLUE AND WHITE PROJECT

I love decorating for the holidays.  LOVE.  I love getting out all of my gingerbread decorations and Christmas ornaments.  Sophie gets a little confused- I'm not sure dogs remember well enough to know that this is something that happens temporarily every year- but she usually calms down.  I'm hoping to go out shopping during the after-Christmas sales this year and get myself a beautiful white tree and turquoise ornaments and next year be able to put a special tree in my craft room.  *crossing fingers*

The card I made for today is so simple to make!  I cut an A2 card base from light blue cardstock and put some blue snowflake patterned paper from All Seasons 2 (from Paper Studio) over it.  

The sentiment on the card is cut from Winter Frolic.  It's three layers- the white shadow, the dark blue sentiment, and the light blue accent letters.  I always forget that about the sayings that cartridges have, or I think of them only being for titles on scrapbook pages or something.  But the fact of the matter is that used alone, they can make really nice, simple cards!  

I finished it up with three little gems from Hobby Lobby in the corner and it was done!  I think I may make some more cards using Cricut sentiments.  


Take a break from hanging those holiday lights and go check out Pause, Dream, Enjoy Challenges to see what blue and white creations the rest of the DT has come up with!  Then pull out your blue and white scraps and come join us!


I'll also be entering this card into a few challenges:
My Craft Spot- Merry Christmas
Die Cuttin Divas- Holiday Spirit
Scrappy Moms Stamps- Christmas Time
Pin It

Thursday, December 6, 2012

Christmas bird


Today I've got a card with the bird from Jolly Holidays.   I used a background paper from the All Seasons stack from Paper Studio.  I also used some red snowflake ribbon from my stash.  The bird's eye wasn't well defined, so I traced it with white gel pen and then went over that with silver stickles.

It's kind of hard to see in the picture, but I stamped "Merry Christmas" from My Creative Time's 'Gift Card Sentiments' set in the top corner.


This card is going to be entered into the following challenges:
Exploring Cricut  Christmas Card                              
Paper Playtime  Christmas Colors             
Pin It

Saturday, December 1, 2012

Winter Wishes

Now that Christmas is coming closer, I am having a great time with the Jolly Holidays cartridge!  This was the first cut that I made from it back when I bought the cartridge, and then I had put it away in my extras drawer, and decided to pull it out to play with it!  I used white cardstock as my background paper, embossed with the Polka Dots Cuttlebug folder.  I punched it on the edge with the Martha Stewart loops punch.  It's actually a punch around the page punch, but I only wanted the edger for this one.  I used an old scrap of Paper Studios paper for the blue snowflakes on the other side- I have a ton of these because they were leftovers from last year's Christmas cards.  Then I put Mystic Green Stickles on the handle (they're so dark you can't really tell) and used Candy Cane Stickles on the red part of the umbrella to outline it.  

I know that I cut the circle tag from the Cricut, but I can't remember what cartridge it was from.  Any circle would do.  Then I punched it with a regular hole punch and strung some white ribbon through it.  I stamped it in blue with the Stampendous Everything Happy stamp set.


I'm entering this card into the following challenges:
Fantabulous Cricut- Holiday Wishes


Pin It